Your first webhook
This guide will walk you through receiving your first webhook from the Depop Selling API: we'll register a webhook configuration, trigger a test purchase, and watch the order notification arrive at your endpoint.
If you're not familiar with webhooks yet, the Webhooks concept page explains what they are and how they work.
Prerequisites
Before you start, make sure you have:
- A staging (testing) API key. Our API is currently private and is not available to the general public. If you are interested in integrating with Depop, please contact us at [email protected], and we'll get back to you with the next steps. We issue separate API keys for the staging and production environments — this guide uses the staging environment throughout, so make sure you're using your staging key. Production keys won't work here (and vice versa).
- Postman installed with an account. You can use any client but this guide will use Postman as an example.
- Postman configured for this API. If you haven't done this yet, please follow the Your first listing guide first.
- A listing that is on sale. We'll trigger a purchase of it to generate a webhook. The Your first listing and Your first sale guides get you there.
- A publicly accessible HTTPS URL that can receive
POSTrequests. For this guide you don't need to write any code — a request inspection service like webhook.site gives you a unique URL where you can watch requests arrive in the browser. Don't use a service like this for real data; it's for testing only.
Step 1: Configure authentication
The API expects requests to have an Authorization header with your API key as a bearer token:
Note
The webhook configuration endpoints currently only support API key authentication. They are not yet available through the OAuth 2.0 flow.
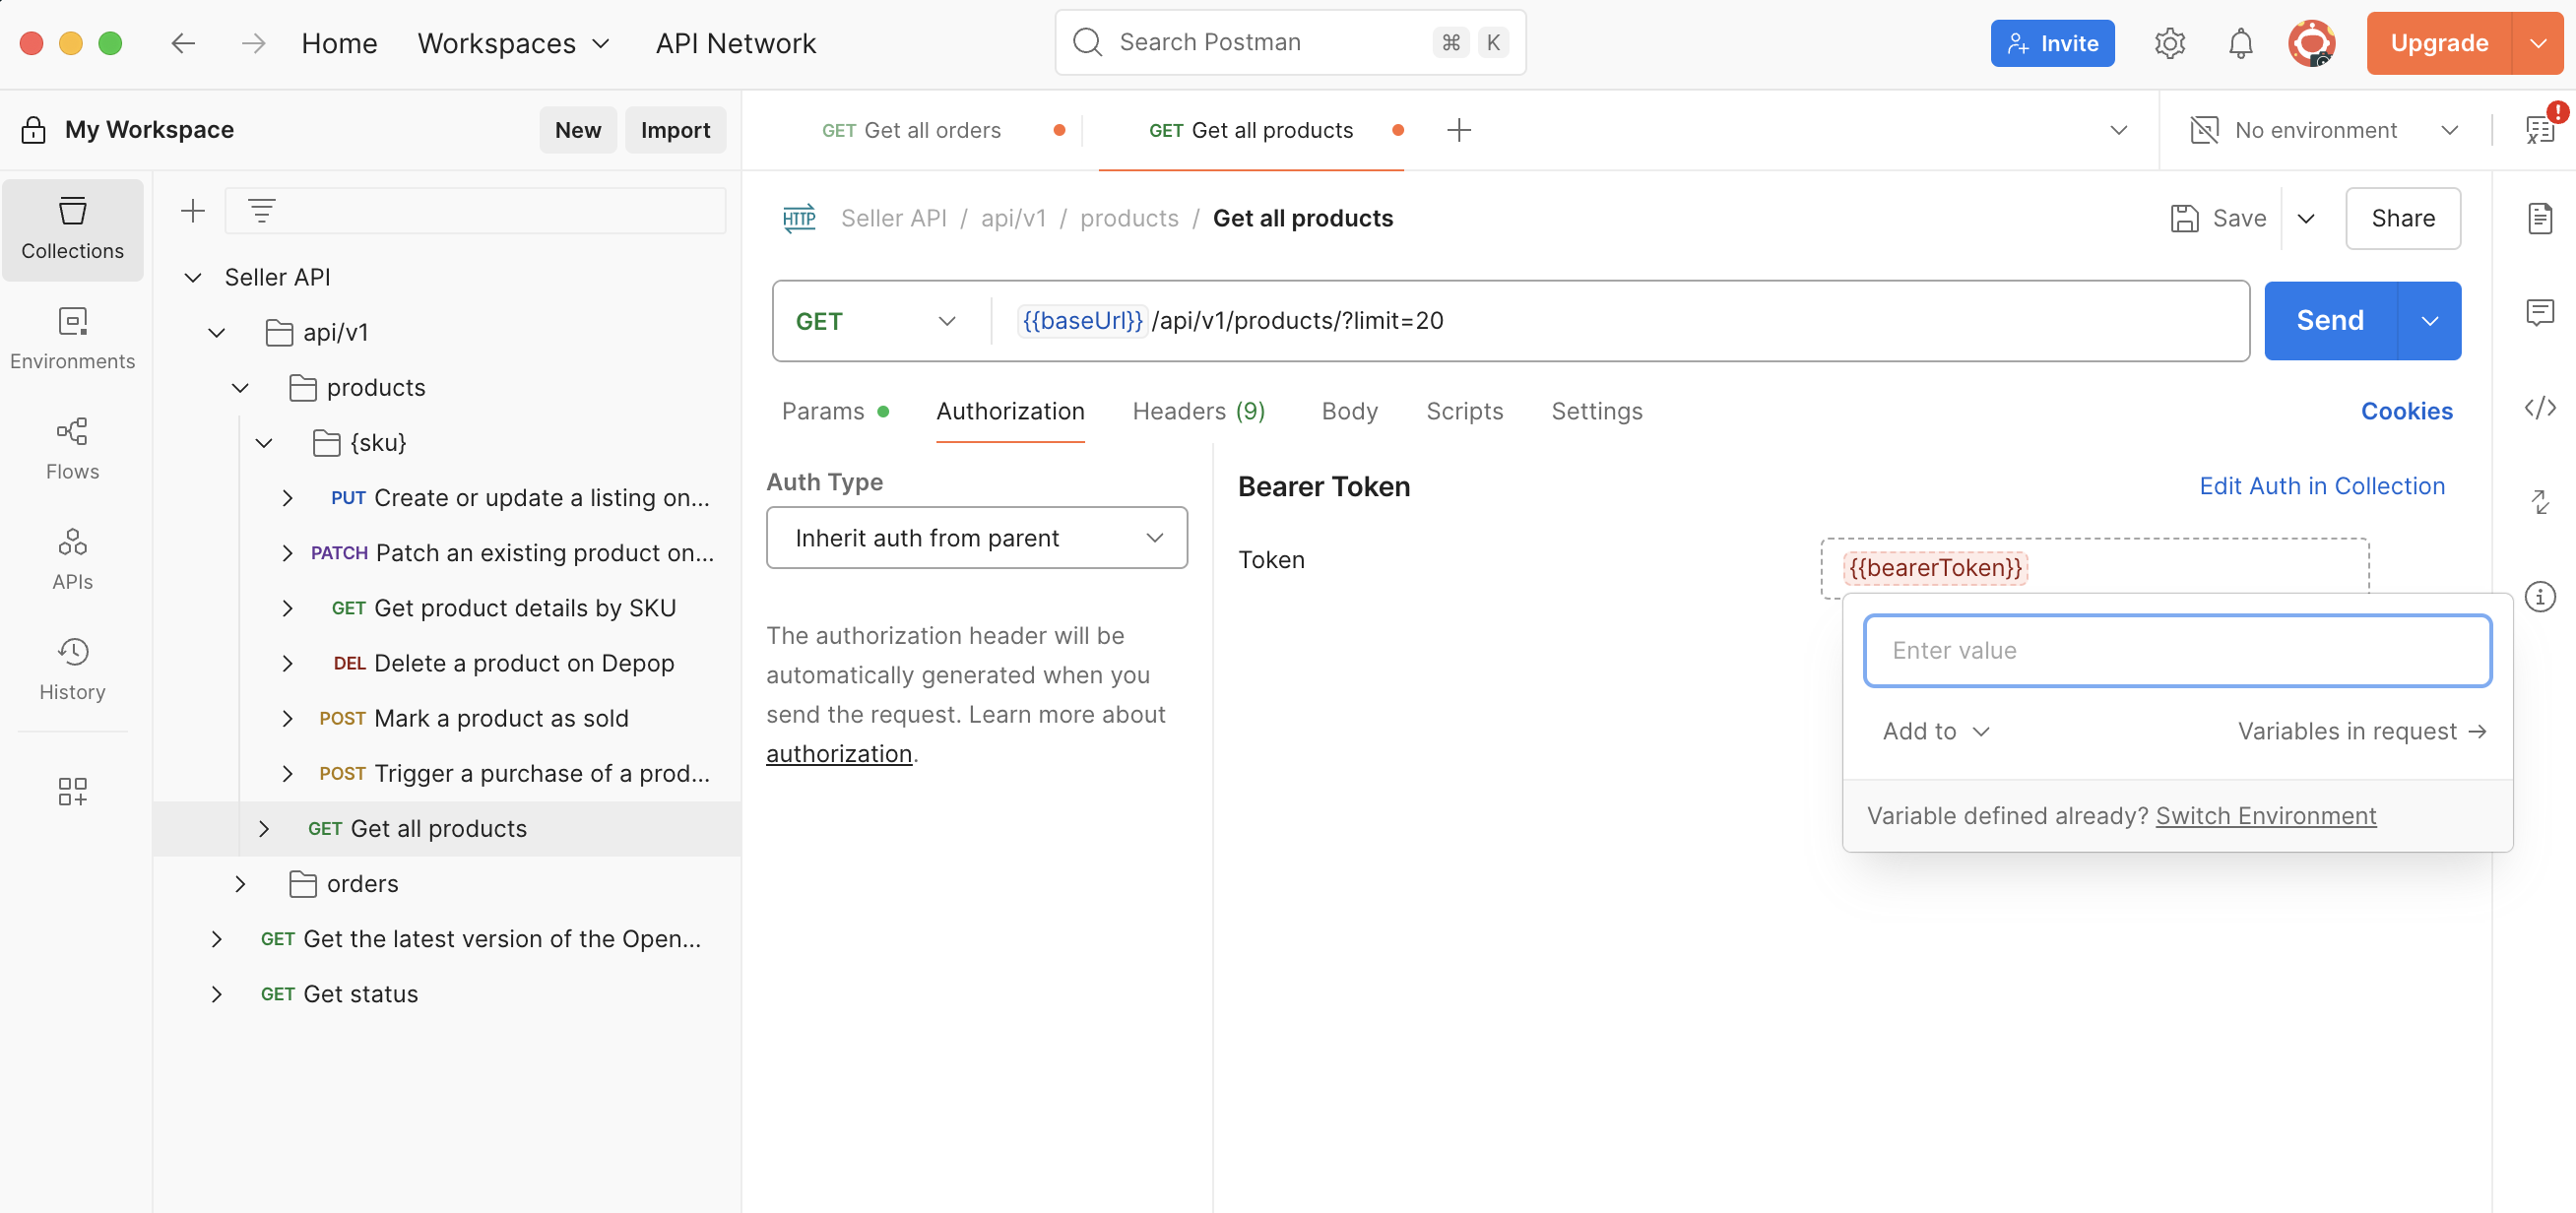
To configure this in Postman, follow these steps:
- Open the Seller API collection.
- Expand
api/v1>webhooksand select theCreate a new webhook configurationrequest. - Underneath the URL, click on the Authorization tab.
- You should see Bearer Token auth type with
{{bearerToken}}field already present. If not, select Bearer Token from the dropdown and enter{{bearerToken}}in the field. - Now enter your staging API key by hovering over the
{{bearerToken}}.
Here's a screenshot showing how to do this:
Tip
Make sure you add the {{bearerToken}} variable to your Postman collection so it's shared across all requests.
If you don't want to set this up, that's ok but remember to do this for every endpoint you use next.
Step 2: Register a webhook configuration
Let's tell Depop where to send webhooks and which events we care about.
- In Postman, expand
api/v1>webhooksand select theCreate a new webhook configurationrequest. - Go to the Body tab and set it to:
We're using the
v1:order.*wildcard here, which subscribes us to all order events — new orders, refunds, and updates. You can also list events individually, e.g.v1:order.new. See the Webhooks concept page for all available event types. - Click on the Send button.
You'll get back a 200 OK response similar to this:
{
  "webhook_id": "33a735f2-e68f-49b4-8192-45fb7ec50ce6",
  "secret": "rncxmdh5v2b37etli3ajb0e8f3xvopel"
}
Save your secret now
The secret is shown only once, in this response — it is never returned again. Store it securely. You'll need it to validate that incoming webhooks genuinely came from Depop.
Step 3: Check your configuration
Let's confirm the configuration was registered:
- In Postman, expand
api/v1>webhooksand select theGet all webhook configurationsrequest. - Click on the Send button.
You should see your new configuration, keyed by its webhook_id:
{
  "33a735f2-e68f-49b4-8192-45fb7ec50ce6": {
    "url": "https://your-endpoint.example.com/webhooks",
    "enabled": true,
    "event_types": [
      "v1:order.*"
    ]
  }
}
Step 4: Trigger a purchase
Now let's generate an order event. Since you can't access our testing environment through the app or website, we have a developer endpoint that simulates a purchase from a test buyer account.
- In Postman, expand
api/v1>products>{sku}and select theTrigger a purchase of a product (for testing)request. - Make sure the path variable
skumatches your on-sale listing. If you followed the Your first listing guide, it will beABC-12345-S-BL. - Click on the Send button. This request takes a bit longer than others to complete, as we are orchestrating several calls internally.
Once it finishes you'll get back a 200 OK response.
Step 5: Receive your webhook
Head over to your endpoint (e.g. your webhook.site page) — within a few moments you should see a POST request arrive. That's your first webhook! 🎉
The body will look something like this:
{
  "id": "a210923f-c1f3-4d84-a2bd-7f18c68553e2",
  "event_type": "v1:order.new",
  "created_at": "2025-01-01T00:00:00Z",
  "data": {
    "seller_id": 123456,
    "purchase_id": "435017619960",
    "status": "SHIPPING_PENDING",
    "currency": "GBP",
    "buyer_pays_amount": "31.49",
    "seller_receives_amount": "25.38",
    "line_items": [
      {
        "purchase_item_id": 2490660,
        "sku": "ABC-12345-S-BL",
        "product_id": 7238212,
        (...)
      }
    ],
    (...)
  }
}
Note the two headers that come with every webhook:
X-Depop-Signature— an HMAC-SHA256 signature of the request, computed with your secret from Step 2.X-Depop-Timestamp— when the webhook was sent, as seconds since the Unix epoch.
In production you should always verify the signature before trusting a webhook — the Validate webhooks guide shows you how.
Cleaning up
If you used a temporary testing URL, delete the configuration when you're done so we don't keep sending webhooks to it:
- In Postman, expand
api/v1>webhooks>{webhookConfigId}and select theDelete a webhook configurationrequest. - Set the path variable
webhookConfigIdto thewebhook_idfrom Step 2. - Click on the Send button.
You'll get back a 204 No Content response. Alternatively, you can pause deliveries without deleting the configuration by sending a PATCH request with {"enabled": false} using the Update a webhook configuration request.
Next steps
Now that you've received your first webhook, point a configuration at your real integration endpoint and start reacting to events as they happen — and make sure to validate the signature of every webhook you receive.
Webhooks are delivered on a best-effort basis, so keep reconciling with the orders endpoint as described in the Webhooks concept page.
If you run into any issues or have questions, please reach out to us.